 Vancouver Island Pottery Supply

Normal Hours of Operation Closed all provincial and federal holidays Next closure for a Stat holiday is for CLOSED FRIDAY APRIL 3RD & MONDAY APRIL 6TH
Information Plainsman Products ClaysLow Temperature ClaysMedium Temperature Clays High Temperature Clays Porcelains Other Clays Native Clays Casting Slips MaterialsDry MaterialsStains Encapsulated Stains Liquids GlazesLaguna Dry Low Fire GlazesDuncan Low Fire Clear Glazes Spectrum Opaque Gloss Low Fire Glazes Spectrum Majolica Colors Spectrum Semi-Transparent Low Fire Glazes Spectrum Satin Matte Low Fire Glazes Spectrum Metallic Glazes Spectrum Raku Glazes Plainsman Dry Glazes Potter's Choice Cone 5/6 Glazes Celadon Cone 5/6 Glazes Moroccan Sand Glazes Spectrum Hi Fire Cone 6 Glazes Spectrum Shino Glazes Cone 6 Spectrum Celadon Glazes Cone 6 Liquid Brights UnderglazesSpectrum 500 UnderglazesUnderglaze Tools Amaco Velvet Underglazes EnamellingEnamelling SuppliesEquipmentKilnsElectric Pottery KilnsElectric Glass Kilns Kiln Furniture Cones Elements Kiln Parts, Accessories Exhaust Systems Refractories Potter's Wheels Slab Rollers Hand Extruders Pugmills Scales Banding Wheels Air Brushes ToolsBrushesThrowing Tools Trimming, Turning, Cutting Tools Wood/Bamboo Tools Wire and Wood Tools Rollers/Stamps Decorating Tools Glazing Tools Ribs & Scrapers Ribbon/Wire Tools Rasps Knives, Needle Tools, Cutters Sculpture Tools Tool Kits Unclassified AccessoriesMiscellaneous AccesoriesCorks/Stoppers Cork Pads Dispenser Pumps Teapot Handles Bisque Tiles Magazines | Covid-19 Status: Click here to find out more
Visit Our Full Catalog & Store CLOSED FRIDAY APRIL 3RD & MONDAY APRIL 6TH.OPEN MONDAY -FRIDAY 9:00 - 4:00
Vancouver Island Pottery Supply has a large supply of pottery materials. Equipment...wheels, kilns, slabrollers. Clay, dry materials, great selection of tools. Product can be put together for pick up, or shipping is available. Prices are subject to change without notice
We strive to give our customers great customer service, while shopping in the store or by phone. Our staff knows our product and equipment, and can help you with your selections. If you have a larger order to get together please call or email the order in, so we can have your product ready. Email sales@vipotterysupply.com or call 250 248-2314. 25% TARIFFS- Watch this space for updates
As of March 7, 2025, Vancouver Island Pottery Supply anticipates that some tariffs will impact our pricing. Vancouver Island Pottery Supply expects that Canada will leave all tariffs against the USA in place as long as any tariffs remain in place against Canada. Specifically, this policy may increase the pricing of the following US items by 25%. Vancouver Island Pottery supply will attempt modify this list for our customers as the situation develops, and as we learn more details: Confirmed 25% Tariff on Skutt Kiln elements
Technical Tips BlogJoining rules are differentWhen clay is soft and plastic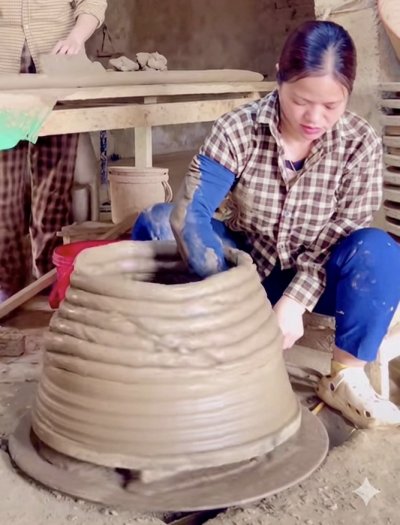
This woman has quickly laid coils of plastic clay on top of each other, in a conical shape. Then she simply begins throwing, centering, compressing and even verticaling the walls on the first pull. Since joining stiffer clay elements, as done in typical hand-building, can be a time-consuming elaborate process, how can this potter just ignore that? Context: The incredible plasticity of.., Video Throwing a large.., Plasticity Tuesday 28th April 2026 Does this poodle belong in this team?Does the frit you use belong in your glaze recipe?
In industry it is normal to use frits whose chemistry is either unknown or approximate provided. The manufacturer has designed them for a specific use, so in many cases they comprise 80%+ of recipes used for that purpose. However potters more commonly use them as minor additions to recipes, they source needed oxides to the oxide formula (instead of raw materials). Context: Frit, Glaze Chemistry Monday 27th April 2026 DIY glazes can do something commercial ones cannot:Go on evenly, in one coat and dry in seconds.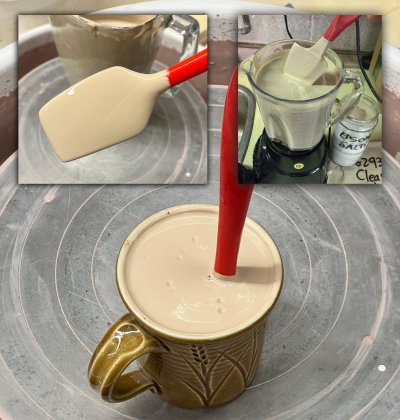
Commercial brushing glazes are laced with CMC gum to make them paint on thin and dry slowly. Why would anyone want that? Layering. Brushing on layers takes time and it is difficult to get even coverage, but it justifies brushing up the prices also! Context: Layer slayers and jar.., Here is my setup.. Monday 20th April 2026 High tension porcelain insulatorsNot like the porcelain you use for pottery
Electrical insulators most often employ aluminous porcelains. Like sanitaryware and tableware (mullite porcelains), feldspar still forms some glass, but the microstructure of electrical porcelains is dominated by angular, size-controlled, alumina grains. Only a small amount of mullite forms. The result is a matrix having much better mechanical and dielectric strength, better insulating properties and resistance to thermal shock. How can this be affordable given that calcined alumina is many times more expensive than other common porcelain ingredients? When producers are already extremely careful to meet specifications, rejects are low enough that the added cost of alumina is acceptable given the performance gains. Context: Porcelain Insulators Monday 20th April 2026 Faux majolica next level: Stoneware!But the glaze is crawling under the colors.
The original Italian majolica ware was red earthenware with a thick layer of tin-opacified glaze vibrantly brush-decorated using single-strokes of watery metal oxides. The water-color of ceramics. But tin oxide is no longer affordable. And ceramic stains are better. And no one uses lead glazes. So all majolica-like ware made today is actually “faux (false) majolica”. These test samples take the “faux” to the next level: Stoneware with a zircon-opacified white glaze. But almost all are crawling. If this happens for you ask these questions: Context: Glaze large bowls inside-and-out.., The secret to brushing.., Stain Medium, Crawling Monday 20th April 2026 A light bulb moment in solving bubble clouding:The same black engobe with two transparent glazes.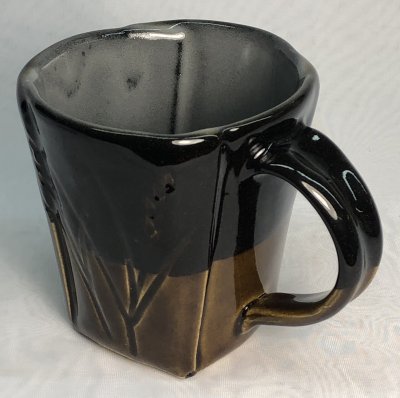
This is a buff stoneware body, Plainsman M340. A L3954F black engobe was applied inside and upper-outside at leather hard. The piece was fired at cone 6 using the PLC6DS schedule. The inside, totally clouded glaze, is G2926B. Outside is GA6-B Alberta Slip amber transparent. This inside glaze is crystal-clear on other bodies (and on this one without the black engobe). The black stain in the engobe appears to be the issue. How? Context: Thick application clouds a.., Glaze bubbles behaving badly.., Zircopax as a fining.., 2 Copper carbonate in.., Fining Agent, Glaze Bubbles, Clouding in Ceramic Glazes.. Thursday 9th April 2026 Why this copper glaze does not micro-bubble or craze:High cone 6 melt fluidity, low surface tension, MgO
This green is not just a typical transparent cone 6 glaze with 2% copper carbonate added (and 2.5% tin oxide). That outer glossy glaze accommodates the copper without micro-bubbling or crazing because of its lower melt surface tension. In such glazes, significant MgO (a super low expansion oxide) can often be tolerated without losing gloss. This is a light bulb moment. Fully 0.15 molar of MgO are present here. This is the "matting oxide"! Yet the glaze is still hyper-glossy! Context: G3806C, 2 Copper carbonate in.., Fluid Melt Glazes Wednesday 8th April 2026 Specific gravity using a scale and graduated cylinder:It doesn't matter how high you fill it
Counterbalance a graduated cylinder on a 0.01g scale and pour in some slurry. Fill it to any level that does not exceed the weight the scale can handle. Divide the weight by the volume. In this case, it weighs 60.6g and the volume is 41. That calculates to about 1.47 specific gravity. The higher it is filled, the higher the quality of the graduated cylinder and the better you are at reading the level, the more accurate the measurement will be. In this case, I just need an approximate measure. After adding more water to this glaze, I will measure again, filling it to near the 100cc level. I have to use a plastic cylinder because our glass one is too heavy for this scale to handle (its max is 200g). Context: Measure specific gravity using.., Are cheap plastic graduated.., Specific gravity Wednesday 8th April 2026 When kilns are not candled long enough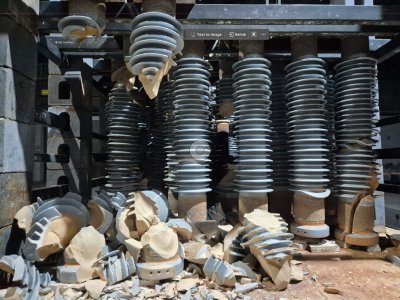
Candling of kilns is the final stage of drying. Driers cannot achieve the temperatures needed to remove all water, so almost all industries rely on early stages of firing to remove it fully. Failures like this are part of the learning curve of every company (because there is always pressure to fire as fast as possible). Context: This is what happens.., Automated porcelain insulator trimming.., Dehydroxylation in kaolin ball.., Pore water removed in.., Candling, Porcelain Insulators Friday 27th March 2026 Paint another layer on a fired glaze?Yes. With CMC gum.
The cone 6 mug on the left has the G3933A glaze, applied as a dipping glaze. It turned out poorly - crawling from corners and looking thin and washed out. I made a brushing glaze version of this (which adds 1.5% CMC gum), I keep it around for this very purpose. It has a high specific gravity (unlike commercial ones that have high water contents - they will run and go on too thin if you try this). Because of the gum, it dries hard, there is no shrinkage or cracking. On a second firing, using the C6DHSC schedule again, (mug on the right) the surface is transformed - thicker, more vibrant color. Context: CMC Gum, Six layers 85 Alberta.., Control gel using Veegum.., The degree-of-matteness of this.. Thursday 26th March 2026 2% Copper carbonate in two cone 6 transparents:One does not bubble and orange-peel. Why?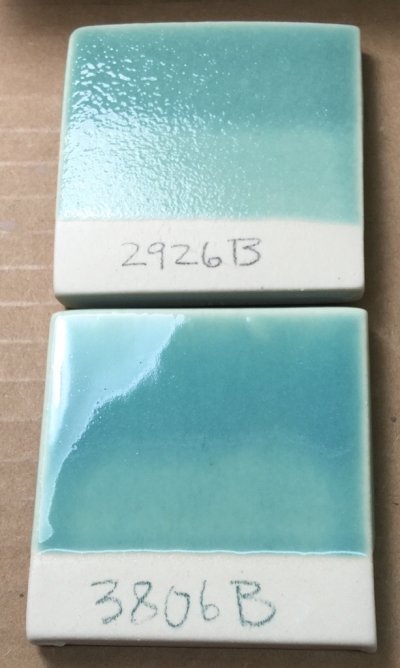
The top base glaze, G2926B, has enough melt fluidity to produce a brilliant functional gloss when used as a transparent. However, for this 2% copper carbonate addition, it has too little melt fluidity and/or too much surface tension to merge, pass and heal the entrained micro-bubbles (generated by the decomposition of the carbonate). Context: Copper Carbonate, Copper Carbonate Basic, Zinc Oxide, ZnO, G3806C, Why this copper glaze.., A light bulb moment.., Underglazes require a fluid.., Flux Thursday 26th March 2026 A Clear Glaze is Bubbled Over DIY Underglazes:The Real Solution Is in the Underglaze Recipe
Potters often encounter the problem shown here. These pieces are fired at cone 6. They are decorated with underglazes made from a mix of porcelain powders and stains. The transparent glaze works over certain colors but on others, it is full of microbubbles and pinholes. The potter has not had success finding a transparent overglaze that works consistently. Stain manufacturers do not mix stains with porcelain to making underglazes. Context: A 2oz jar of.., Here is another reason.., Underglaze, Stain Medium Saturday 21st March 2026 DIY the commercial glaze on mug #1:You must consider five factors to make it work
The mug on the left, #1, is a commercial brushing glaze. It is opaque enough to cover this red-burning clay body. It shows the desired effect. That depends on the fact that opaque glazes stretch thinner on the sharp edges of incised designs. If they have enough melt mobility and are applied right, the effect is amplified. This potter is attempting to mix her own DIY equivalent as a dipping glaze, adding 4% tin oxide to a transparent base glaze in #2 and zircon (a higher percentage) in #3. As you can see, the effect is not working as well, and there are several reasons: Context: A comparative glaze opacity.., Opacity, Opacifier Thursday 26th February 2026 Multilayer crawling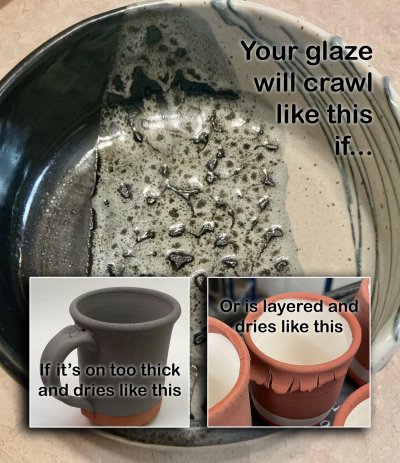
Oil-spot effects depend on being able to layer glazes. Normally, a black underneath and matte white over top. Using dipping glazes is obviously advantageous for this type of piece; the second dip covers the other half and creates the double layer needed. But dipping glazes contain clay in the recipe (almost always kaolin or ball clay), it satisfies multiple needs: It suspends the slurry, hardens the drying glaze, and supplies critical Al2O3 to the chemistry. The upper glaze here is a matte; so it needs extra Al2O3, which means it likely has extra clay. 20% kaolin (non-plastic like EPK, Grolleg, NZ) is about the maximum or the glaze will shrink too much when drying. If extra Gerstley Borate is added, then it will be worse. Drying cracks are the result when the fragile body-bond of the lower one fails to withstand the stresses of being rewetted and tugged upon by the upper layer being applied and drying. When the cracked double-layer begins to melt, it pulls itself into islands, leaving bare body between. That is called "crawling". Context: Glaze Layering, Crawling Tuesday 17th February 2026 Tile stacking in an electric kiln - Fingers crossed!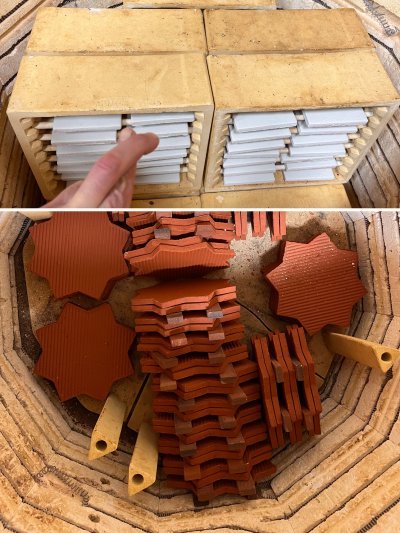
Small-scale operations everywhere are making tile like this. Most use plastic clay intended for pottery, which introduces more drying shrinkage, complicating drying them flat. Stacking them in the kiln can be a game of chance. Stacked too tightly and they crack (mostly because of quartz inversion). Stacked to loosely and most of the energy goes into heating the shelves and stackers. Using a clay with minimal large quartz particles is the best way to avoid dunting, however that is also a balance since such clays are more difficult to fit glazes to (without crazing). Context: Tile having angular shape.., An unevenly cooled tile.., It possible to make.., A plastic pottery clay.. Tuesday 17th February 2026 |
Vancouver Island Pottery Supply, 515 Stanford Avenue E, PARKSVILLE, BC V9P 1V6
Phone: 250-248-2314, FAX: 250-248-2318, Email: sales@vipotterysupply.com